|
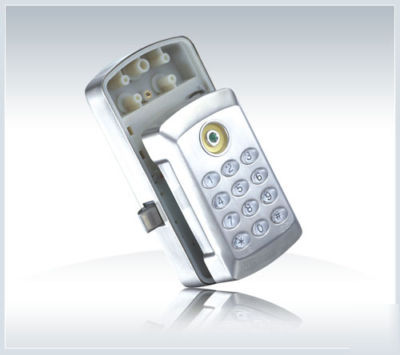
Keyless Digital Lock Set for Locker/Cabinet (Brand New) (1) Three levels of lock management (lock/unlock): master level, admin level, and user level. (2) A single master key card and a single admin key card can manage thousands of locks. (3) Best used in the locker room of swimming pools, fitness centers, golf courses, schools, companies, etc. (4) Read more details in the user manual below. (1) The lock (front piece and back piece. The front piece color is silver). (2) One TM touch key card (in yellow or red), one for the master user, one for the admin user. A public user should use any number keyed in by him/her as pin code. (3) All necessary hardware for lock installation (Three required AA batteries not included). Dmensions: Height x Width x Thickness (front piece): 4" x 2-1/4" x 3/4"; (back piece): 5-3/8" x 2-3/4" x 13/16" Figure 1. TM Touch Key Card ( The card size is similar to that of a front door key. See Figure 1) (You will actually receive a yellow one and a red one) Figure 2. Photo of the lock (including the front and the back pieces, front piece color is silver, see Figure 2) Figure 3. Installation drawing (any locker/cabinet door thinkness is OK). iB Key Cabinet Lock User Manual (1) Install 3 AA alkaline batteries into the battery holder. (2) Connect the wire plug of the front lock piece to the socket of the rear lock piece. (3) Identify the reset button: on the back of the front lock piece, there is a small hole (roughly behind the # key of the keypad. The reset button is right in the hole. II. EXPLANATION OF TOUCH KEY TYPES AND PIN TYPES (1) For a given lock, an individual touch key can be programmed to be ONE and only one of the three key types: master, admin, and user. But this same key can be also programmed to be a key of a different type to another lock. That is, key A can be programmed to be a master key for lock B, and be a admin key for lock C, and be a user key for lock D, and a admin key for lock E. Therefore a single key can be programmed for hundreds of locks. (2) Master (Touch) Key: each lock may have only one master key. This key has the highest level of lock management rights but cannot be used to open the lock. It is used to program the admin key and admin pin. Any touch key can be programmed as the admin key. If a new admin key is programmed, then the old admin key and all old user pin codes will no longer work. (3) Admin (Touch) Key: each lock may have only one admin key. It is used to program the user key and user pins. Once the admin key is used to open the lock, all the existing user key and user pins will no longer work. (4) User (Touch) Key: each lock may have only one user key. This key is optional. If it is set, it can lock and unlock the lock independently if no user pins are set. If both user key and user pin(s) are set, the key and a pin must be used jointly to open and close the lock. (5) Admin pin: each lock may have only one admin pin of 1 8 digits. Once set, it can open and close the lock independently. (6) User pin (preset by admin): multiple user pins of 1 8 digits can be programmed. If a user pin is used to lock the lock, then other user pins cannot unlock it. That is, user pins work exclusively. However, any higher level key or admin pin can always unlock it. (7) User pin (Randomly selected by user): The lock can be set in the way that a user can randomly select a pin to lock the lock, and then use the same pin to unlock it (see details below). However, any higher level key or admin pin can always unlock it. III. SELECT LOCKING MODE (Automatic or Manual) (1) Before programming keys and pins, you should select locking mode. Holding down the reset button with a needle or toothpick until you hear melody music twice (release the reset button immediately as soon as the second music ends), you will then hear motor rotating and see the latch to protrude or retract. If the latch stays protruding, it is in automatic locking mode because you bang the door against door frame to lock it. If the latch stays hidden inside, it is in manual locking mode because you need to use touch key or pin code to lock it. NOTE: the first music indicates that the lock initiation is done, and the second music tells that the locking mode has been switched. (2) Repeat step (1) to change between automatic and manual locking modes. (1) Make the master key (1 pc only): After the locking mode is selected, any key that touches the sensor eye of the lock becomes the master key. You will hear four short beeps Di, Di, Di, Di indicating that the master key is successfully made. To re-make master key, you just reset the lock again. (2) Make the admin key (1 pc only): Touch the master key on the sensor eye, LED light flash and a long beep sounds, then touch another key on the sensor eye, after a short beep, this key becomes the admin key. (3) Make the user key (1 pc only, optional): Touch the admin key on the sensor eye, LED light flash and a long beep sounds, then touch another key on the sensor eye, after a short beep, this key becomes the user key. (4) Create the admin pin (only one allowed): Touch the master key on the sensor eye, LED light flash and a long beep sounds, key in * Plus number Plus #, for example *35623#, a short beep signals the success of creating admin pin. NOTE: pin number is 1 to 8 digits. To delete admin pin: Touch the master key on the sensor eye, LED light flash and a long beep sounds, key in *0#, a short beep signals the success of creating the admin pin. (5) Create pre-defined user pin (many user pins allowed): Touch the admin key on the sensor eye, LED light flash and a long beep sounds, key in * Plus number Plus #, for example *5413#, a short beep signals the success of creating user pin. NOTE: pin number is 1 to 8 digits. To delete user pin: Touch the admin key on the sensor eye twice, all user level key and pins will be invalidated. (6) Randomly selected user pin by user without being pre-defined by admin key: (IMPORTANT: the lock must be in manual mode). Following the step (2) to re-make admin key. Type in 1# immediately after you make the admin key (you must act quickly within 2 seconds), then type in 1# again. Now the lock is in random user pin mode. That means, a user can type in any number PLUS # to lock the lock, and then unlock it by entering the same number PLUS #. (1) Use random user pin: type in any number PLUS # to lock the lock, and then unlock it by entering the same number PLUS #. (2) Use pre-defined user pin: On the keypad, type in * PLUS pin number PLUS # to lock/unlock door. IMPORTANT: the same user pin used to lock the door is required to unlock it. A different but valid user pin cannot unlock it. If no user key was made, then any user pin can work independently. If the user key was made, you need to combine the user key and a user pin: touch the user key on the sensor eye and type in the *pin#. (3) Use user key: If no user pin was created, the user key works independently. If the user pin(s) was created, you need to combine the user key and a user pin: touch the user key on the sensor eye and type in the *pin#. (4) Use admin key: touch the admin key twice on the sensor eye to open the door. CAUSION: once the admin key is used to open door, all user key and pins will be deleted. (5) Use admin pin: Type in *pin number#. NOTE: the use of admin pin will not affect user key or user pins. (6) Create the admin pin (only one allowed): Touch the master key on the sensor eye, LED light flash and a long beep sounds, key in * Plus number Plus #, for example *35623#, a short beep signals the success of creating admin pin. NOTE: pin number is 1 to 8 digits. To delete admin pin: Touch the master key on the sensor eye, LED light flash and a long beep sounds, key in *0#, a short beep signals the success of creating the admin pin. (7) Use master key: master key cannot directly open the lock, however, it can be used to re-issue the admin key and admin pin. After a new admin key is issued, the old admin key and old admin pin will not work any more. Now you can use the new admin pin or key to open door. In case the batteries totally gone, use a 6V external power to connect to the emergency socket (at the bottom of the front panel) ,then use a key or pin as usual to unlock the door. When battery voltage is at or below DC3.4V, if you unlock the door, the lock will emit continuous alarm sound to indicate low voltage, after opening, the batteries must be replaced immediately. We are the original equipment manufacturer, if you need locks that require the key and pins to work in different combinations of ways, or longer pin digits, or any other requirements. Please write to dionne-dejesus@chicagopartsnetwork.com , we can make them specifically for you. (1) The lock (front piece and back piece) (4) All necessary hardware for lock installation (Keyless electronic digital keypad locker cabinet lock was posted and is owned by: Dionne Dejesus) |
dionne-dejesus@chicagopartsnetwork.com (Dionne Dejesus) for more information.